8. 2-Dimensional Iteration: Image Processing
Two-dimensional tables have both rows and columns. You have probably seen many tables like this if you have used a spreadsheet program. Another object that is organized in rows and columns is a digital image. In this section we will explore how iteration allows us to manipulate these images.
A digital image is a finite collection of small, discrete picture elements called pixels. These pixels are organized in a two-dimensional grid. Each pixel represents the smallest amount of picture information that is available. Sometimes these pixels appear as small “dots”.
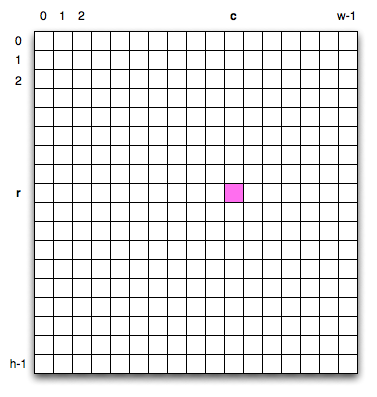
Each image (grid of pixels) has its own width and its own height. The width is the number of columns and the height is the number of rows. We can name the pixels in the grid by using the column number and row number. However, it is very important to remember that computer scientists like to start counting with 0! This means that if there are 20 rows, they will be named 0,1,2, and so on through 19. This will be very useful later when we iterate using range.
In the figure below, the pink pixel is found at column c and row r.
The RGB Color Model
Each pixel of the image will represent a single color. The specific color depends on a formula that mixes various amounts of three basic colors: red, green, and blue. This technique for creating color is known as the RGB Color Model. The amount of each of the three colors, sometimes called the intensity of the color, allows us to have very fine control over the resulting color.
The minimum intensity value for a basic color (red, green, and blue) is 0. For example if the red intensity is 0, then there is no red in the pixel. The maximum intensity is 255. This means that there are actually 256 different amounts of intensity for each basic color. Since there are three basic colors, that means that you can create 2563 distinct colors using the RGB Color Model.
Here are the red, green and blue intensities for some common colors. Note that “Black” is represented by a pixel having no basic color. On the other hand, “White” has maximum values for all three basic color components.
Color Red Green Blue Red 255 0 0 Green 0 255 0 Blue 0 0 255 White 255 255 255 Black 0 0 0 Yellow 255 255 0 Magenta 255 0 255
In order to manipulate an image, we need to be able to access individual pixels. This capability is provided by a module called image. The image module we will use — which is not a standard Python module — defines two classes: Image and Pixel.
Each Pixel object has three attributes: the red intensity, the green intensity, and the blue intensity. A pixel provides three methods that allow us to ask for the intensity values. They are called getRed, getGreen, and getBlue. In addition, we can ask a pixel to change an intensity value using its setRed, setGreen, and setBlue methods.
Method Name Example Explanation Pixel(r,g,b) Pixel(20,100,50) Create a new pixel with 20 red, 100 green, and 50 blue. getRed() r = p.getRed() Return the red component intensity. getGreen() r = p.getGreen() Return the green component intensity. getBlue() r = p.getBlue() Return the blue component intensity. setRed() p.setRed(100) Set the red component intensity to 100. setGreen() p.setGreen(45) Set the green component intensity to 45. setBlue() p.setBlue(156) Set the blue component intensity to 156.
In the example below, we first create a pixel with 45 units of red, 76 units of green, and 200 units of blue. We then print the current amount of red, change the amount of red and print it, and finally, set the amount of blue to be the same as the current amount of green and print both amounts.
Note
There have been occasional issues with using the image module in the Firefox browser. If you are unable to run the code on this page that uses the image module, please try running it in a different browser.
Check your understanding
-
If you have a pixel whose RGB value is (50, 0, 0), what color will this pixel appear to be?
- Dark red
- Because all three values are close to 0, the color will be dark. But because the red value is higher than the other two, the color will appear red.
- Light red
- The closer the values are to 0, the darker the color will appear.
- Dark green
- The first value in RGB is the red value. The second is the green. This color has no green in it.
- Light green
- The first value in RGB is the red value. The second is the green. This color has no green in it.
Image Objects
To access the pixels in a real image, we need to first create an Image object. Image objects can be created in two ways. First, an Image object can be made from the files that store digital images. This object will have attributes corresponding to the width, the height, and the collection of pixels in the image.
It is also possible to create an Image object that is “empty”. The method EmptyImage() can be used to return an Image object that has a width and a height. However, the pixel collection consists of only “white” pixels.
We can ask an Image object to return its size using the getWidth and getHeight methods. We can also get a pixel from a particular location in the image using getPixel and change the pixel at a particular location using setPixel.
The Image class is shown below. Note that the first two entries show how to create Image objects. The parameters are different depending on whether you are using an image file or creating an empty image.
Method Name Example Explanation Image(filename) img = image.Image(“cy.png”) Create an Image object from the file cy.png. EmptyImage() img = image.EmptyImage(100,200) Create an Image object that has all “White” pixels getWidth() w = img.getWidth() Return the width of the image in pixels. getHeight() h = img.getHeight() Return the height of the image in pixels. getPixel(col,row) p = img.getPixel(35,86) Return the pixel at column 35, row 86. setPixel(col,row,p) img.setPixel(100,50,mp) Set the pixel at column 100, row 50 to be mp.
Consider the image shown below. Assume that the image is stored in a file called “luther.jpg”. Line 2 opens the file and uses the contents to create an image object that is referred to by img. Once we have an Image object, we can use the methods described above to access information about the image or to get a specific pixel and check on its basic color intensities.

When you run the program you can see that the image has a width of 400 pixels and a height of 244 pixels. Also, the pixel at column 45, row 55, has RGB values of 165, 161, and 158. Try a few other pixel locations by changing the getPixel arguments and rerunning the program.
Check your understanding
-
Using the previous ActiveCode example, select the answer that is closest to the RGB values of the pixel at row 100, column 30? The values may be off by one or two due to differences in browsers.
- 149 132 122
- These are the values for the pixel at row 30, column 100. Get the values for row 100 and column 30 with p = img.getPixel(30, 100).
- 183 179 170
- Yes, the RGB values are 183 179 170 at row 100 and column 30.
- 165 161 158
- These are the values from the original example (row 45, column 55). Get the values for row 100 and column 30 with p = img.getPixel(30, 100).
- 201 104 115
- These are simply made-up values that may or may not appear in the image. Get the values for row 100 and column 30 with p = img.getPixel(30, 100).
Image Processing and Nested Iteration
Image processing refers to the ability to manipulate the individual pixels in a digital image. In order to process all of the pixels, we need to be able to systematically visit all of the rows and columns in the image. The best way to do this is to use nested iteration or nested loops.
Nested iteration simply means that we will place one iteration construct inside of another. We will call these two iterations the outer iteration (or outer loop) and the inner iteration (or inner loop). To see how this works, consider the iteration below.
for i in range(5):
    print(i)
We have seen this enough times to know that the value of i will be 0, then 1, then 2, and so on up to 4. The print will be performed once for each pass. However, the body of the loop can contain any statements including another iteration (another for or while statement). For example,
for i in range(5):
    for j in range(3):
        print(i, j)
The for i iteration is the outer iteration and the for j iteration is the inner iteration. Each pass through the outer iteration will result in the complete processing of the inner iteration from beginning to end. This means that the output from this nested iteration will show that for each value of i, all values of j will occur.
Here is the same example in activecode. Try it. Note that the value of i stays the same while the value of j changes. The inner iteration, in effect, is moving faster than the outer iteration.
Another way to see this in more detail is to examine the behavior with codelens. Step through the iterations to see the flow of control as it occurs with the nested iteration. Again, for every value of i, all of the values of j will occur. You can see that the inner iteration completes before going on to the next pass of the outer iteration.
(nested2)
Our goal with image processing is to visit each pixel. We will use an iteration to process each row. Within that iteration, we will use a nested iteration to process each column. The result is a nested iteration, similar to the one seen above, where the outer for loop processes the rows, from 0 up to but not including the height of the image. The inner for loop will process each column of a row, again from 0 up to but not including the width of the image.
The resulting code will look like the following. We are now free to do anything we wish to each pixel in the image.
for row in range(img.getHeight()):
    for col in range(img.getWidth()):
        # do something with the pixel at position (col,row)
One of the easiest image processing algorithms will create what is known as a negative image. A negative image simply means that each pixel will be the “opposite” of what it was originally. But what does opposite mean?
In the RGB color model, we can consider the opposite of the red component as the difference between the original red value and 255. For example, if the original red component was 50, then the opposite, or negative, red value would be 255-50 or 205. In other words, pixels with little red in them will have negatives with lots of red and pixels with lots of red will have negatives with little. We do the same for the blue and green values of each pixel as well.
The program below implements this algorithm using the previous image (luther.jpg). Run it to see the resulting negative image. Note that there is a lot of processing taking place and this may take a few seconds to complete. In addition, here are two other images that you can use (cy.png and goldygopher.png).

cy.png
goldygopher.png
Change the name of the file in the image.Image() call to see how these images look as negatives. Also, note that there is an exitonclick method call at the very end which will close the window when you click on it. This will allow you to “clear the screen” before drawing the next negative.
Let’s take a closer look at the code. After importing the image module, we create an image object, img. We will work with the pixels of the image, transforming them according to the algorithm.
Lines 8 and 9 create the nested iteration that we discussed earlier. This allows us to process each pixel in the image. Line 10 gets an individual pixel.
Lines 12-14 create the negative intensity values by extracting the original intensity from the pixel and subtracting it from 255. Once we have the new_red, new_green, and new_blue values, we can create a new pixel (Line 16).
Finally, we need to replace the color values in the original pixel with those in new_pixel. It is important to set the pixel values of the pixel at the exact same spot in the photo as the original pixel whose values we made opposites of.
Try to change the program above so that the outer loop iterates over the columns and the inner loop iterates over the rows. We still create a negative image, but you can see that the pixels update in a very different order.
Other pixel manipulation
There are a number of different image processing algorithms that follow the same pattern as shown above. Namely, take the original pixel, extract the red, green, and blue intensities, and then create a new pixel by modifying them. The new pixel’s values are then used to set the pixel values of the original pixel (or you could insert the new pixel into an empty image at the same location as the original if you wanted to create a modified copy of the image).
For example, you can create a gray scale pixel by averaging its red, green and blue intensities and then using that value for all intensities.
From the gray scale you can create black and white by setting a threshold and selecting to either insert a white pixel or a black pixel into the empty image.
You can also do some complex arithmetic and create interesting effects, such as Sepia Tone
You have just passed a very important point in your study of Python programming. Even though there is much more that we will do, you have learned all of the basic building blocks that are necessary to solve many interesting problems. From an algorithmic point of view, you can now implement selection and iteration. You can also solve problems by breaking them down into smaller parts, writing functions for those parts, and then calling the functions to complete the implementation.
What remains is to focus on ways that we can better represent our problems in terms of the data that we manipulate. We will now turn our attention to studying the main data collections provided by Python.
Check your understanding
- Output a
- i will start with a value of 0 and then j will iterate from 0 to 1. Next, i will be 1 and j will iterate from 0 to 1. Finally, i will be 2 and j will iterate from 0 to 1.
- Output b
- The inner for loop controls the second digit (j). The inner for loop must complete before the outer for loop advances.
- Output c
- The inner for loop controls the second digit (j). Notice that the inner for loop is over the list [0, 1].
- Output d
- The outer for loop runs 3 times (0, 1, 2) and the inner for loop runs twice for each time the outer for loop runs, so this code prints exactly 6 lines.
What will the following nested for loop print? (Note, if you are having trouble with this question, review CodeLens 3).
for i in range(3):
    for j in range(2):
        print(i, j)
a.

0 0
0 1
1 0
1 1
2 0
2 1

b.

0   0
1   0
2   0
0   1
1   1
2   1

c.

0   0
0   1
0   2
1   0
1   1
1   2

d.

0   1
0   1
0   1
- It would look like a red-washed version of the bell image
- Because we are removing the green and the blue values, but keeping the variation of the red the same, you will get the same image, but it will look like it has been bathed in red.
- It would be a solid red rectangle the same size as the original image
- Because the red value varies from pixel to pixel, this will not look like a solid red rectangle. For it to look like a solid red rectangle each pixel would have to have exactly the same red value.
- It would look the same as the original image
- If you remove the blue and green values from the pixels, the image will look different, even though there does not appear to be any blue or green in the original image (remember that other colors are made of combinations of red, green and blue).
- It would look the same as the negative image in the example code
- Because we have changed the value of the pixels from what they were in the original ActiveCode box code, the image will not be the same.
What would the image produced from the previous ActiveCode look like if you replaced the lines:
new_red = 255 - p.getRed()
new_green = 255 - p.getGreen()
new_blue = 255 - p.getBlue()
with the lines:
new_red = p.getRed()
new_green = 0
new_blue = 0